Digital Coin Photography

Hints and Tricks

I receive many questions from viewers of Shieldnickels.Net about how I create some of the detailed photos of coins seen on the site. So, I created this write-up to tell you how.

I use a 3 megapixel Nikon 995. This is a great camera. Unfortunately, it's no longer made, but can still be picked up on eBay (or its successor, the 4 megapixel Nikon 4500). The swiveling design is terrific for use in photographing coins. The Nikon seems to do a great job getting the white balance right in auto white balance mode - can't say if other cameras would do as well. To see a picture of the Nikon 995 and read a review, visit Steve's Digicams, which is a great site for camera reviews. The 995 review starts on this page:

http://www.steves-digicams.com/2001_reviews/nikon995.html

The camera you use is probably much less important than how you use it. I would expect to be able to get good results with any 3 megapixel (or greater) camera. However, the Nikon 995 and 4500 have the singular advantage of maintaining focus throughout their zoom range in macro mode. All other point and shoot cameras I've investigated only maintain focus at the widest end of the zoom range in macro mode. For extreme closeups, I strongly recommend the Nikons.

Here's my digital coin photography hints and tricks:

A digression for those unfamiliar with camera terms - if you know all about apertures and exposures and depth of field skip this blue text.

Aperture describes how wide the lens of the camera will open when taking a picture. Exposure determines how long the lens will remain open. Many people use their digital camera in full-auto mode - this means that the camera automatically picks both the best aperture and exposure for the photograph. When taking typical snapshots this works quite well, but it does not work well for coin photography.

Setting the camera to aperture priority mode means that I am telling the camera how wide to open the lens. The camera will still choose for me how long to keep the lens open - the exposure.

Depth of field describes how much of the image will be in sharp focus. A greater depth of field means a greater area of sharp focus at different distances from the camera lens. Depth of field is related to aperture - the smaller the aperture, the greater the depth of field. So I choose to use aperture priority mode so that I can select an aperture that will allow a greater depth of field. When using a macro lens focusing becomes very critical, so increasing the depth of field is very beneficial.

Aperture is measured in f-stops. Higher f-stops mean smaller lens openings.

Just for your information, most digital cameras can also be put into shutter priority mode. This allows the photographer to choose the exposure while the camera chooses the aperture. This is good for fast moving objects - long exposures create motion blur. I have yet to see a coin jump up and move around while I was trying to photograph it, so shutter priority mode is not useful for coin photography.
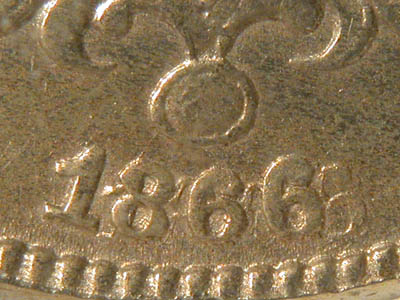
With the above setup, photos of entire coins are a snap (literally <grin>). Photos of features like repunched dates can still be a little bit fussy with the focus - sometimes I have to take a couple test shots before I get the camera positioned on the camera stand exactly right. 1/4 inch off can make a big difference when one is blowing up a tiny date on a small coin.

Here is just one sample of the quality of photograph obtainable with the above setup. This is a photograph of a dramatically repunched date on a shield nickel. The actual size of the date is comparable to the size of the date on a modern (Jefferson) nickel.

Changes last made on: Friday April 5, 2024 0:02

This page copyright (C) 2005 by Howard Spindel. All rights reserved.