Preferences
Choosing File: Preferences allows control over the behavior of SNV as described below. After modifying any of the Preferences, choose "Cancel" to abort saving the new preferences or choose "Save" to make the new Preferences permanent. In the event that new Preferences are saved, SNV will exit and you must restart SNV for the new Preferences to take effect.
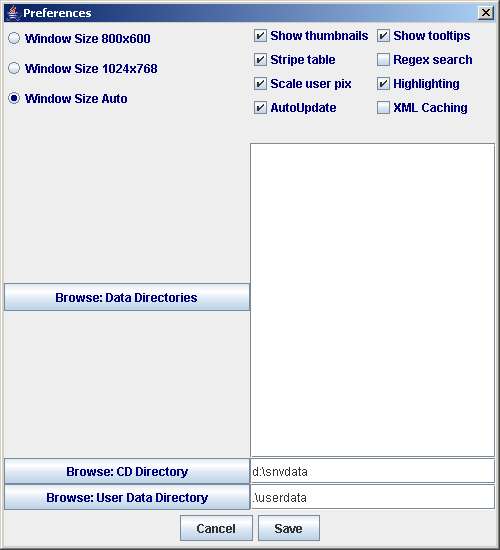
Preferences Dialog
Window Size
While the screenWidth and screenHeight can theoretically take on any values by manually editing the INI file, only 1024 by 768 and 800 by 600 are recommended. The recommended resolutions are the only ones available in the Preferences dialog.
Using 1024 by 768 results in using the maximum resolution pictures. Using 800 by 600 may be desirable on systems where screen real estate is limited.
Selecting Window Size Auto allows SNV to pick the optimal setting for your computer automatically, and is the recommended setting.
There is no advantage to setting this larger than 1024 by 768. Settings smaller than 800 by 600 will cause the viewer to abort.
Data Directories and CD Data Directories
The Data Directories and the CD Data Directory tell SNV where to find its data files. The default configuration file assumes that your CDRom is drive D:. If this is not the case (especially true if you are not running Windows!) replace the CD Data Directory with a directory specification that points to the 'data' subdirectory on your CDRom.
The Data Directory specifies a directory on your hard disk where updated Viewer data files are stored. (If the same file name exists in both directories, the Data Directory file will take precedence allowing updates to files on the CDRom.) The Data Directory may be placed anywhere on your hard disk. Multiple Data Directory lines may be specified for multiple data directories, and the first file seen takes precedence when duplicate file names are found.
The appropriate directories may be typed into the fields by hand, or may be selected from a file browser by clicking on the button to the left of the field (the buttons marked "Browse: Data Directories" and "Browse: CD Directory"). For the data directories the file browser allows multiple selections in the usual manner for multiply selecting on your platform. New data directories are added to the end of the list so select the directories in order from newest to oldest. The file browser only allows a single selection for the CD directory, and each new selection replaces any existing selection.
If desired, the entire contents of the CDRom data directory may be copied to a directory on your hard disk and an appropriate Data Directory declaration given. In this case, the CD Data Directory declaration should be removed. Putting all of the data files on your hard disk improves the performance and eliminates the need to always have your CDRom loaded, at the expense of using your hard disk space for the (voluminous) data files.
User Data Directory
The User Data Directory controls where User Data (data that you, the end user adds) is stored. It defaults to a userdata subdirectory below the installation directory.
The appropriate directory may be typed into the field by hand, or may be selected from a file browser by clicking on the button to the left of the field (the button marked "Browse: User Data Directory").
Thumbnails
Thumbnails are provided on the picture viewing page for easier navigation. Most users will want to leave them enabled (leave the thumbnails checkbox checked). On some very old systems, the thumbnails may cause some performance problems as the images are scaled in real time. Uncheck the thumbnails checkbox if performance problems occur.
Tooltips
Tooltips are 'flyover help' boxes seen by hovering the mouse over certain buttons. Most users will want tooltips enabled (leave the tooltips checkbox checked). If tooltips bug you, you can turn them off by unchecking the tooltips checkbox.
Stripe Table
In the main window, by default the rows are alternately striped in different colors to allow for better visual tracking across rows (like old computer printout had green and white bars). If the stripes bug you, you can turn them off by unchecking the stripe table checkbox.
Regex Search
Regular Expressions are a powerful matching tool for searching text fields. If you know how to use Regular Expressions, you may enable Regular Expression searching of the Additional Data field in filters by checking the Regex search box. If you don't know what Regular Expressions are, best to leave them disabled. See Filtering for a little more information about Regular Expressions.
Scale User Pix
User pictures may be optionally scaled to automatically fit in the viewer window. By default this feature is turned on. Performance of user picture viewing may be improved by turning the feature off. If turned off, for best results user pictures should be prescaled to a height of 520 pixels if using 800x600 screen resolution or 691 pixels if using 1024x768 screen resolution. Note that if this feature is disabled and the height of the user pictures is greater than the recommended size (per screen resolution) then only the portion of the user picture that fits in the viewer window will be visible, and the scroll bars will not work to view the off-screen parts.
Highlighting
The highlighting switch controls whether or not the end user highlighting feature is enabled. This feature allows selected entries in the SNV database to be highlighted. Please see Highlighting for a full discussion. Highlighting defaults to off.
AutoUpdate
The AutoUpdate switch controls whether or not SNV will automatically check to see if any downloadable updates are available each time SNV is restarted. Because SNV must contact a website to check for updates, turning AutoUpdate on is only recommended if you have an always on internet connection (e.g. DSL or Cable), and is not recommended for Dial-Up connections. If no updates are available, SNV is silent. If an update is available, SNV presents a dialog box and asks you if you would like to download the updates now. If you choose not to download the updates immediately, you can always download them later by using Online: D/L Updates.
Additionally, if you have one of the early versions of SNV that runs from 4 CDs, you should not enable AutoUpdates as it will always detect missing files that are on CDs that are not present. To take advantage of the AutoUpdate feature if you have the 4 CD version, load your SNV data to your hard disk (directions for doing so are in the FAQ).
XML Caching
This switch controls whether or not SNV caches the textual data about varieties (called the XML data) on your hard disk. Turning this switch on will greatly improve the load time of SNV if you are loading SNV data from a DVD. The switch will have little, if any, effect if you have copied your SNV data to your hard disk and are loading SNV data from that hard disk The first time you run SNV after enabling XML caching, SNV will take a little bit longer to load while the cache files are built.
Cache files are stored in a subdirectory of the SNV installation directory named cache. If caching is active and the files in this directory are deleted, they will be automatically recreated. SNV also detects if new data files have been downloaded and updates the cache data when that happens.
If you ever suspect a problem with corrupted cache data, you can use File: Clear XML Cache to clear out all cached data and force a cache rebuild.
Manually Editing the INI File
The ShieldNickelViewer.INI file contains all of the settings controlled by the preference dialog above. It is possible, although not recommended, to edit the INI file manually instead of using the preferences dialog. Make sure to use a "plain text" editor - that is an editor that does not insert any formatting characters. An example of a plain text editor under Windows is Notepad.
The INI file contains internal documentation explaining the meaning of each of the available settings.